On-Premise Setup
This documentation describes Heartex platform version 1.0.0, which is no longer supported. For information about on-premises setup and installation of Label Studio Enterprise Edition, the equivalent of Heartex platform version 2.0.x, see Install Label Studio Enterprise on-premises using Docker.
If you need to meet strong privacy regulations, legal requirements, or you want to make a custom installation within your infrastructure or any public cloud (AWS, Google, Azure, etc.), Heartex works on-premises. It is a self-contained version (no Internet connection is required) of the Platform, no data will leave your infrastructure. To make the installation the most accessible, we offer a Docker image.
Overview
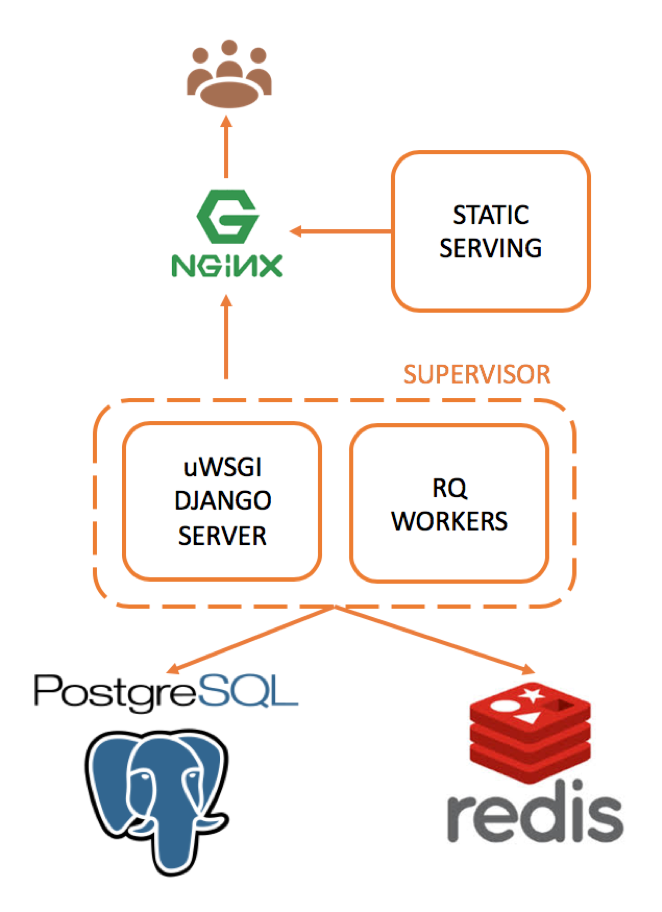
Heartex backend stack consists of multiple components, each of them deployed as an isolated Docker containers. The main components are:
Platform
heartex
The main backend server. All processes are managed by the supervisor that takes care of:
- uWSGI DJANGO server for most of web backend operations
- RQ workers for performing background operations like running predictions and starting model training job
nginx
Proxy web server for serving incoming requests and static files (js/css scripts and media)
db
PostgreSQL database as principal data storage
Current supported PostgreSQL version is 11.5
redis
Redis server for keeping background jobs and temporary data
System requirements
Platform requirements
Your system must have installed:
- Docker
The recommended version is >= 18.03
To ensure that your docker installation works correctly and that you have the necessary rights to install and run docker images, run: docker info. Please ensure that you don’t get an error like permission denied, and instead see the details of your docker installation. - (optionally) Docker Compose
The recommended version is >= 1.18
Warning: The running docker host must have the vm.max_map_count setting variable to be at least greater than 262144. You can check the value by running: sysctl vm.max_map_count. If it is too low, set the value by running: sudo sysctl -q -w vm.max_map_count=262144.
- Bash Shell
Installed in practically all systems by default.
Clarification: any other Unix shell should work too, including for Windows the Unix-like environment Cygwin. However, only the Bash shell is officially supported. - cURL
Installed in practically all systems by default
Machine Requirements
Your server (e.g. private one, or on AWS, Azure, or Linode) should meet the following minimum requirements: - Memory:
On-Premises: 8GB RAM (e.g. t3.large); recommended 16GB RAM (e.g. t3.xlarge)
Disk: 50 GB of disk space - PostgreSQL 11.5
- Redis 5.0.6
Installation using Docker
Platform deployment
Step 1: Pull the latest image
Your organization should be authorized to use Heartex images. Please contact us to receive an auth token.
1.1. Setup docker login:
docker login --username heartexlabsYou will be asked to enter the password, enter the token here. If Login Succeeded, there will be created ~/.docker/config.json with auth settings.
1.2 Pull the latest Heartex image:
docker pull heartexlabs/heartex:latestNote: In some cases, you need to use
sudomode.
Step 2: Get the license file
You have to obtain license.txt file to get docker running. Please contact us if you haven’t it yet. Create a working directory e.g. heartex:
mkdir -p heartex
cd heartex
Be sure to store your license file at heartex/license.txt.
Step 3: Quick start using docker-compose
Note: This step is optional only if you are planning to run Platform in a development mode. If you want to connect Platform to the external PostgreSQL and Redis servers, go immediately to the next step.
If you are planning to run Platform for development purposes, you can start using it with local PostgreSQL and Redis servers.
3.1. Be sure you have docker-compose command installed on your system.
3.2. Create configuration file heartex/config.yml with the following content:
version: '3'

services:
  db:
    image: postgres:11.5
    hostname: db
    restart: always
    environment:
      - POSTGRES_HOST_AUTH_METHOD=trust
    volumes:
      - ./postgres-data:/var/lib/postgresql/data
      - ./logs:/var/log/heartex
    ports:
      - 5432:5432
  heartex:
    image: heartexlabs/heartex:latest
    container_name: heartex
    volumes:
      - ./license.txt:/heartex/label_studio_enterprise/htx/settings/license_docker.txt
    environment:
      - HEARTEX_HOSTNAME=http://localhost:8080
      - POSTGRE_NAME=postgres
      - POSTGRE_USER=postgres
      - POSTGRE_PASSWORD=
      - POSTGRE_PORT=5432
      - POSTGRE_HOST=db
      - REDIS_LOCATION=redis:6379
    command: ["./deploy/wait-for-postgres.sh", "db", "supervisord"]
    ports:
      - 8080:8080
    depends_on:
      - redis
    links:
      - db
      - redis
  redis:
    image: redis:5.0.6-alpine
    hostname: redis
    volumes:
      - "./redis-data:/data"
    ports:
      - 6379:6379
3.3. Start all servers using docker-compose
docker-compose -f config.yml upNote: Don’t forget about other services running on the ports: 5432, 6379, 8080. Modify “-ports:” for db, heartex or redis in config.yml if they interfere.
3.4. Open http://localhost:8080 in a browser.
Data persistence
When the Heartex server is running via docker-compose, all essential data is stored inside the container.
The following local file storages are linked to container’s volumes to ensure data persistence:
./postgres-datacontains PostgreSQL database./redis-datacontains Redis dumps
The integrity of these folders ensures that your data is not lost even if you completely stop and remove all running containers and images.
Note that ./postgres-data files are specific to PostgreSQL version.
Current supported PostgreSQL version is 11.5.
Step 4: Start using Docker
In case you are going to scale Platform to production deployment, you’ll probably need to link external databases and services. Bellow are hands-on steps to set up the most important settings:
4.1 Create file heartex/env.list with environmental variables list:
# The main server URL (should be full path like protocol://host:port)
HEARTEX_HOSTNAME=http://localhost:8080

# Auxiliary hostname URL: some platform functionality requires URIs generation with specified hostname,
# in case HEARTEX_HOSTNAME is not accessible from server side, use this variable to specify server host
HEARTEX_INTERNAL_HOSTNAME=

# PostgreSQL database name
POSTGRE_NAME=postgres

# PostgreSQL database user
POSTGRE_USER=postgres

# PostgreSQL database password
POSTGRE_PASSWORD=

# PostgreSQL database host
POSTGRE_HOST=db

# PostgreSQL database port
POSTGRE_PORT=5432

# PostgreSQL SSL mode (https://www.postgresql.org/docs/9.1/libpq-ssl.html)
POSTGRE_SSL_MODE=require

# Specify Postgre SSL certificate
POSTGRE_SSLROOTCERT=postgre-ca-bundle.pem

# Redis location e.g. rediss://[:password]@localhost:6379/1
REDIS_LOCATION=localhost:6379

# Redis database
REDIS_DB=1

# Redis password
REDIS_PASSWORD=12345

# Redis socket timeout
REDIS_SOCKET_TIMEOUT=3600

# Use Redis SSL connection
REDIS_SSL=1

# Require certificate
REDIS_SSL_CERTS_REQS=required

# Specify Redis SSL certificate
REDIS_SSL_CA_CERTS=redis-ca-bundle.pe
LDAP authentication setup
You can setup LDAP auth and assign LDAP users to one platform’s organization via docker environment variables. Here is an working example:
AUTH_LDAP_ENABLED=1
AUTH_LDAP_SERVER_URI=ldap://www.zflexldap.com
AUTH_LDAP_BIND_DN=cn=ro_admin,ou=sysadmins,dc=zflexsoftware,dc=com
AUTH_LDAP_BIND_PASSWORD=zflexpass
AUTH_LDAP_USER_DN_TEMPLATE=uid=%(user)s,ou=users,ou=guests,dc=zflexsoftware,dc=com

# Group parameters
AUTH_LDAP_GROUP_SEARCH_BASE_DN=ou=users,ou=guests,dc=zflexsoftware,dc=com
AUTH_LDAP_GROUP_SEARCH_FILTER_STR=(objectClass=groupOfNames)
AUTH_LDAP_GROUP_TYPE=ou

# Populate the user from the LDAP directory, values below are set by default
AUTH_LDAP_USER_ATTR_MAP_FIRST_NAME=givenName
AUTH_LDAP_USER_ATTR_MAP_LAST_NAME=sn
AUTH_LDAP_USER_ATTR_MAP_EMAIL=mail

# Specifity organization to assign on the platform
AUTH_LDAP_ORGANIZATION_OWNER_EMAIL=heartex@heartex.net

# Advanced options, read more about options and values here:
# https://www.python-ldap.org/en/latest/reference/ldap.html#options
AUTH_LDAP_CONNECTION_OPTIONS=OPT_X_TLS_CACERTFILE=/certificates/ca.crt;OPT_X_TLS_REQUIRE_CERT=OPT_X_TLS_DEMAND
For test login use guest1 with password guest1password.
4.2. When all variables are set, run docker exposing 8080 port:
docker run -d \
-p 8080:8080 \
--env-file env.list \
-v `pwd`/license.txt:/heartex/label_studio_enterprise/htx/settings/license_docker.txt \
-v `pwd`/logs:/var/log/heartex \
-v `pwd`/postgre-ca-bundle.pem:/etc/ssl/certs/postgre-ca-bundle.pem \
-v `pwd`/redis-ca-bundle.pem:/etc/ssl/certs/redis-ca-bundle.pem \
--name heartex \
heartexlabs/heartex:latest
Note: If you expose 80 port, you need to start docker with
sudo.
Health check
You can check if Platform is available by sending requesting to the /health URL:
$ curl http://localhost:8080/health
{"status": "UP"}
Also, you can access the empty metric page with 200 status code if everything is ok:
$ curl http://localhost:8080/metricsUpdating server
Getting docker version
To check the version of Heartex Platform, run docker ps on the host.
Run the following command as root or by using the sudo command
$ docker ps
CONTAINER ID        IMAGE                        COMMAND                  CREATED             STATUS              PORTS                    NAMES
b1dd57a685fb        heartexlabs/heartex:latest   "./deploy/start.sh"      36 minutes ago      Up 36 minutes       0.0.0.0:8080->8000/tcp   heartex
The docker version number is visible in the Image column, e.g., heartexlabs/heartex:latest has an image of version tagged latest
Creating a backup
You need to create a backup version of the current container if the update procedure does not complete successfully or if you decide to rollback your Heartex server.
The docker stop command stops the currently running heartex container:
docker stop heartexThe following command renames the current heartex container to avoid name conflicts during the update procedure:
docker rename heartex heartex-backupPulling a new image
docker pull heartexlabs/heartex:latestUpdating current container
docker run -d \
-p $EXPOSE_PORT:8080 \
-v `pwd`/license.txt:/heartex/label_studio_enterprise/htx/settings/license_docker.txt \
-v `pwd`/logs:/var/log/heartex \
-v `pwd`/postgre-ca-bundle.pem:/etc/ssl/certs/postgre-ca-bundle.pem \
-v `pwd`/redis-ca-bundle.pem:/etc/ssl/certs/redis-ca-bundle.pem \
--name heartex \
heartexlabs/heartex:latest
Restoring the previous version
If for whatever reason, you decide to keep using the old version, you just need to stop and remove the new heartex container.
docker stop heartex && docker rm heartexNow, rename the heartex-backup to heartex and start it.
docker start heartex-backupInstallation on AWS Private Cloud
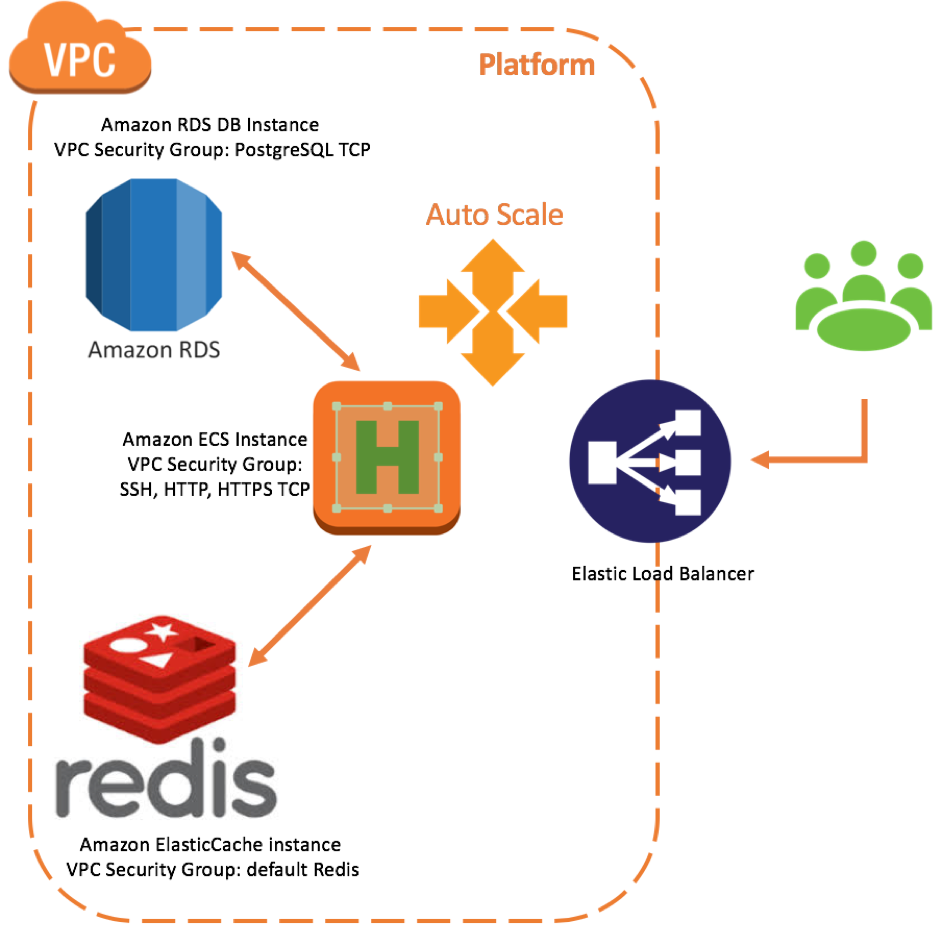
You can deploy to your own private cloud with all necessary components provided by Amazon AWS services. The bundle comes with the following configuration for the Amazon services:
- Virtual Private Cloud (VPC)
- Identity and Access Management (IAM)
- Route53
- Elastic Container Registry (ECR)
- Elastic Container Service (ECS)
- Simple Storage Service (S3)
- ElastiCache
- Relational Database Service (RDS)
- Systems Manager Agent (SSM)
- CodeDeploy
Deployment scripts are distributed as terraform configuration files (.tf). Before you start, please download and install the terraform package for your operating system and architecture. Recommended terraform versions: v0.12.18
Prerequisites
Create root user
To start, you might have to create an initial root user with all the required permissions for deploying AWS components. Skip this step if you have an active AWS profile with full administrative access.
Go to user/ directory and modify user.tf parameters if necessary:
locals {
  user_name   = "heartex-production"
  policy_name = "heartex-production"
  bucket_name = "heartex-terraform-state" // S3 bucket name used to store terraform state
}
Then initializate an run terraform inside that directory:
terraform init
terraform apply
If terminated successfully, you’ll see the following output:
Apply complete! Resources: 6 added, 0 changed, 0 destroyed.

Outputs:

iam_access_key_id = AKIAAWSACCESSKEYID
iam_access_key_secret = 9FaIL7Eza8mAwSsEcReTAcCeSsKeY
Store user credentials within your local environment under specific AWS named profile. For example, append
[heartex-production]
aws_access_key_id = AKIAAWSACCESSKEYID
aws_secret_access_key = 9FaIL7Eza8mAwSsEcReTAcCeSsKeY
to the ~/.aws/credentials file and switch profile by setting export AWS_PROFILE=heartex-production. Read more about how to configure AWS client in your local environment.
Configuration
Go to cd envs/production and open main.tf. Make modifications under locals section related to your private cloud settings.
Note: Get your AWS account ID by calling
aws sts get-caller-identity
locals {
  stack_name           = "heartex-production"
  aws_region           = "us-west-1"
  aws_profile          = "heartex-production"
  public_dns_namespace = "my.heartex.com"
  account_id           = "490012345678" // your AWS account ID

  images          = ["webapp"]
  image_webapp    = "${local.account_id}.dkr.ecr.${local.aws_region}.amazonaws.com/${local.aws_profile}/webapp:latest"

  vpc_cidr_block     = "10.0.0.0/16"
  cidrsubnet_newbits = 8

  bucket_name = "heartex-bucket" // S3 storage for internal use

  node_type = "cache.t2.micro"

  allocated_storage = 5
  user_name         = "postgres" // DB user name
  storage_type      = "gp2" // Storage type: Standart, «gp2» (general-purpose SSD) or «io1» (SSD IOPS)
  instance_class    = "db.t2.micro"  // DB instance type (https://aws.amazon.com/ru/rds/instance-types/)

  licence_file_path = "${path.root}/license.txt"

  // Additional parameters
  redis_ssl           = 0
  redis_ssl_cert_reqs = "required"
  // ...
Deployment
License
Make sure you have a valid license file placed near main.tf, i.e. envs/production/license.txt is an actual license.
Terraform initialization
Before deploying all modules with terraform, you need to initialize terraform state:
terraform initCreate deploy user
Create IAM role that will be used solely for pushing & updating new images.
terraform apply -target module.iamKeep output credentials for:
- making lambda invokations for deploying updates
- providing them to Heartex team in case you want to keep your ECR storage up-to-date with the newest platform versions.
Create container registry
Create ECR where webapp images will be stored:
terraform apply -target module.ecrIf everything is going OK you’ll see the following console outputs:
ecr_repository_urls = {
  "webapp" = "490012345678.dkr.ecr.us-west-1.amazonaws.com/heartex-production/webapp"
}
iam_access_key_maintainer_id = AKIAXEGRLHACCESSKEYID
iam_access_key_maintainer_secret = mrKlneaqzXVcFKlTSECrEtAcCeSsKeY
The created repository URL will be used later for making updates and pushing new webapp versions.
Upload images
Before proceed, created registry should be populated with actual images. Make sure you have the latest Heartex webapp docker image, then run:
docker tag <image name:version> 490012345678.dkr.ecr.us-west-1.amazonaws.com/heartex-production/webapp
docker push 490012345678.dkr.ecr.us-west-1.amazonaws.com/heartex-production/webapp
Configure DNS
Create a managed DNS service with a public URL specify by "public_dns_namespace" parameter:
terraform apply -target module.route53The output contains name servers records that could be used to configure DNS.
route53_zone_name_servers = [
  "ns-1234.awsdns-12.org",
  "ns-5678.awsdns-12.co.uk",
  "ns-123.awsdns-34.com",
  "ns-456.awsdns-34.net"
]
Deploy remaining modules
Run the following command to deploy all remaining services (the process takes around 10 minutes)
terraform applyNote: In case an error happens
Error: Error describing created certificate: Expected certificate to be issued but was in state PENDING_VALIDATIONtry to restart deployment later. This error might be caused of invalid DNS servers which take some time to be updated with the newest records.
Make updates
Heartex team keeps client’s ECR service updated with the latest images with proper namings like heartexlabs/heartex:<version-tag>.
Updating your production to the new image version is done via blue/green deployment:
aws --region <selected-region> lambda invoke --function-name <chosen-stack-name>-deploy --payload '{"service": "webapp", "image": "<image-name-with-proper-version-tag>"}' result.json && cat result.json| jq .Remove private cloud
Destroy all created services:
terraform destroy